分类 六、编程语言 下的文章

一、点乘(Dot Product)、点积 内积

点乘也称为标量积或内积,是两个等长向量之间的运算。它将两个向量的对应元素相乘,然后将乘积相加,得到一个标量值。点乘只适用于向量。

点积是点乘的另一种说法,通常在数学和物理学中使用,但在深度学习中,点乘和点积可以互换使用。

内积通常指的是点乘,是两个向量之间的运算,得到一个标量值。内积的概念也可以扩展到矩阵,称为矩阵乘法,但矩阵乘法的结果是一个矩阵,而不是一个标量。

1、对应元素相乘,求和

dot:只能张量中向量(一维)操作,结果是一个标量。比如两个embedding求相似度。

import torch
x = torch.tensor([1,2,3])
y = torch.tensor([1,1,2])
z = torch.dot(x,y)
print(z)
## 结果:tensor(9)

k = x*y
m = torch.mul(x,y) 
print(k)
print(m)

2、 对应元素相乘,不求和

*和 mul 操作是一样的,要求x,y具有相同的维度(一维向量,二维矩阵都可以)

import torch
x = torch.tensor([[3,3],[3,3]])
y = torch.tensor([[1,2],[3,4]])
k = x*y
m = torch.mul(x,y)  #x.mul(x)
print(k)
print(m)

## tensor([[ 3,  6],
           [ 9, 12]])
## tensor([[ 3,  6],
           [ 9, 12]])

3、 矩阵相乘

@和torch.mm和torch.matmul 作用一样

矩阵相乘有torch.mm和torch.matmul两个函数。其中前一个是针对二维矩阵,后一个是高维。当torch.mm用于大于二维时将报错。
a = [B,E]
b = [E,B]
c = torch.mm(a,b)
C 维度是[B,B]

4、torch.matmul重点解读

matmul 有广播机制

(1)两个 1 维,向量内积

a = torch.ones(3)
b = torch.ones(3)
print(torch.matmul(a,b))  # tensor(3.)

(2)两个 2 维,矩阵相乘

a = torch.ones(3,4)
b= torch.ones(4,3)
print(torch.matmul(a,b))  
# tensor([[4., 4., 4.],
#        [4., 4., 4.],
#        [4., 4., 4.]])

(3)一个 1 维,二个 2 维,矩阵和向量相乘

注意:相靠近的那个维数要相同,比如(7)和(7,8,5),又比如(7,8,5)和(5)

a = torch.ones(3)
b= torch.ones(3,4)
print(torch.matmul(a,b))  # tensor([3., 3., 3., 3.])

a = torch.ones(3,4)
b = torch.ones(4)
print(torch.matmul(a,b))  # tensor([4., 4., 4.])

(4)、高维情况

i)其中一个1维,另一个N维(N>2): 类似3),即需要靠近的那个维数相同,比如(7,)和(7,8,11),又比如(7,8,11)和(11,)

ii)都高于2维,那么除掉最后两个维度之外(两个数的维数满足矩阵乘法,即,(m,p)和(p,n)),剩下的纬度满足pytorch的广播机制。

a=torch.ones(5,3,4,1)
b=torch.ones(  3,1,1)
print(torch.matmul(a,b))

一、pycharm中运行/调试torch分布式训练

整体比较简单,可以参考:我下面的二、pycharm中运行/调试deepspeed分布式训练
关键步骤为:
软链接distributed文件
通过对调用分布式的命令分析,我们首先需要找到torch.distributed.launch这个文件,并将它软链接到我们的Pycharm项目目录下。为什么使用软链接而不是直接复制呢?因为软链接不会变更文件的路径,从而使得launch.py文件可以不做任何改动的情况下去import它需要的包。

在Ubuntu中,通过以下命令创建软链接

ln -s /yourpython/lib/python3.6/site-packages/torch/distributed/ /yourprogram/
以上命令没有直接链接launch.py而是它的父目录distributed,是因为这样比较容易知道launch.py是一个软链接,不与项目中的其他文件混淆。

设置Pycharm运行参数
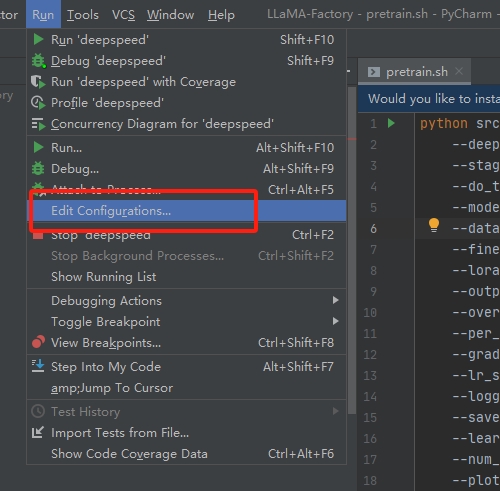
打开Pycharm,依次点击Run->Edit Configurations 进入参数配置界面
微信截图_20240314134956.png

只需要配置Script path为launch.py路径;Parameters为launch.py运行参数,参考命令行调用的方法,设置如下。

--nproc_per_node=4
tools/train.py --cfg xxx.yaml
通过以上步骤就可以在Pycharm中运行分布式训练了。不过,如果是在调试模型最好还是修改一下trian.py文件,通过单GPU方式调试,并不是说分布式模式不能调试,仅仅是因为在单GPU方式下,对于数据流更好把控,减少调试时间

二、pycharm中运行/调试deepspeed分布式训练

1.pycharm版本

我用的是2020.1

2.环境

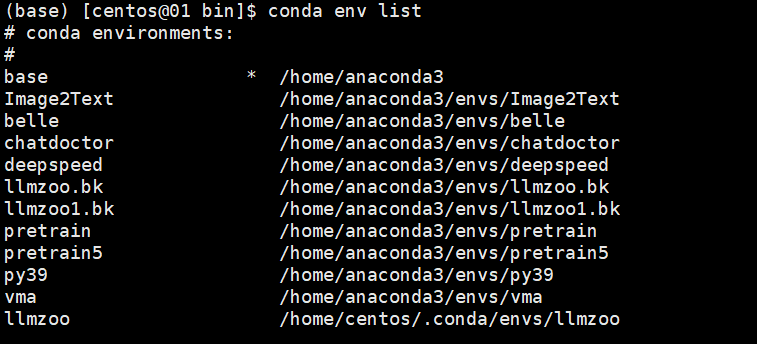
(1)首先服务器上需要配好对应的环境,并且保留代码一份,以及对应的模型,用conda配好虚拟环境
(2)本地只需要拷贝对应的代码和数据,不用拷贝模型
(3)代码,我主要是复现大语言模型的预训练,https://github.com/hiyouga/LLaMA-Factory,其他代码同理
最主要的启动脚本,其他代码也是同理,主要是使用deepspeed启动就行。
pretarin.sh

deepspeed  --master_port=9901 src/train_bash.py \
    --deepspeed ./ds_config.json \
    --stage pt \
    --do_train \
    --model_name_or_path ../Yi-34B  \
    --dataset input_test \
    --finetuning_type full \
    --lora_target q_proj,v_proj \
    --output_dir Yi-34B_output_test \
    --overwrite_cache \
    --per_device_train_batch_size 4 \
    --gradient_accumulation_steps 4 \
    --lr_scheduler_type cosine \
    --logging_steps 5 \
    --save_steps 300 \
    --learning_rate 5e-5 \
    --num_train_epochs 1.0 \
    --preprocessing_num_workers 20 \
    --plot_loss \
    --bf16

3.本地配置:deepspeed安装

将虚拟环境的deepspeed安装包压缩,拷贝到本地。
我服务器虚拟环境的位置:/home/centos/anaconda3/envs/factory/lib/python3.10/site-packages/deepspeed/,
将deepspeed包压缩为zip包,拷贝到本地项目目录:D:codeLLaMA-Factory 然后解压,D:codeLLaMA-Factorydeepspeed

4.远程配置:软链接

查看:vim /home/centos/anaconda3/envs/factory/bin/deepspeed 可以知道实际使用的hideepspeed.launcher.runner
文件,

通过对调用分布式的命令分析,我们首先需要找到deepspeed.launcher.runner这个文件,并将它软链接到我们的Pycharm项目目录下。为什么使用软链接而不是直接复制呢?因为软链接不会变更文件的路径,从而使得runner.py文件可以不做任何改动的情况下去import它需要的包。

在centos中,通过以下命令创建软链接

ln -s /home/centos/anaconda3/envs/factory/lib/python3.10/site-packages/deepspeed/  /data/liulei/cpt/LLaMA-Factory/

如果要删除软连接用:

unlink  /data/liulei/cpt/LLaMA-Factorydeepspeed/

5.pycharm配置

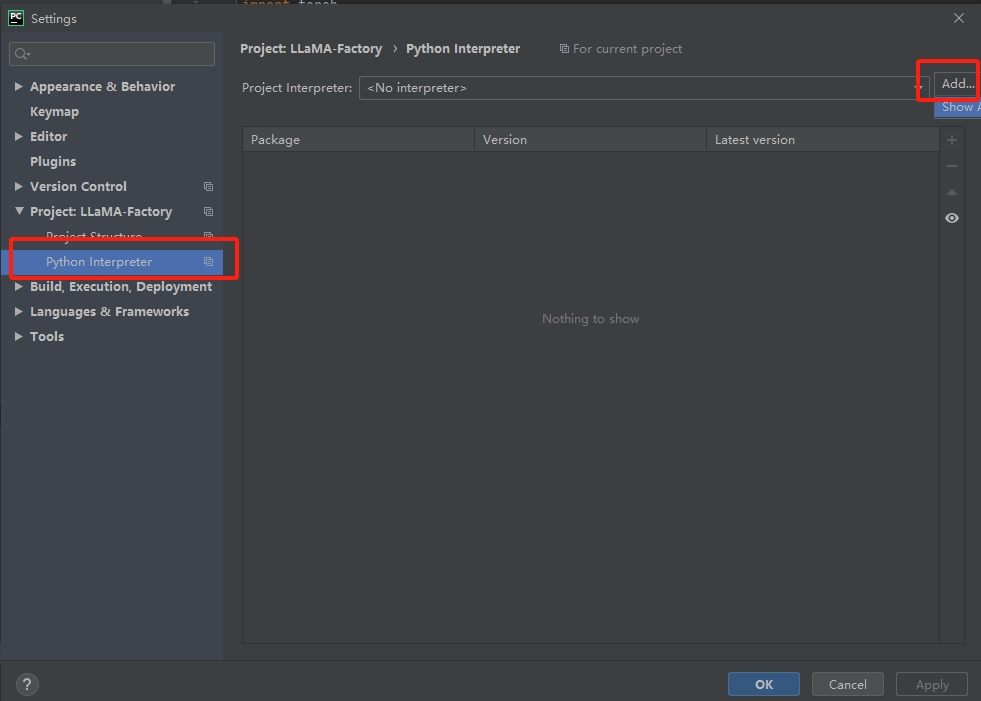
配置本地代码用远程服务器的python解析器:

(1)从set里面进去
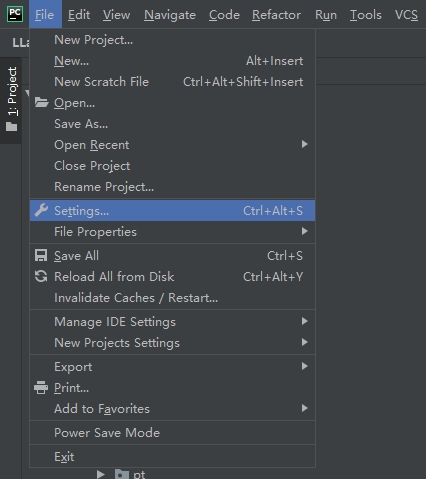
微信截图_.png

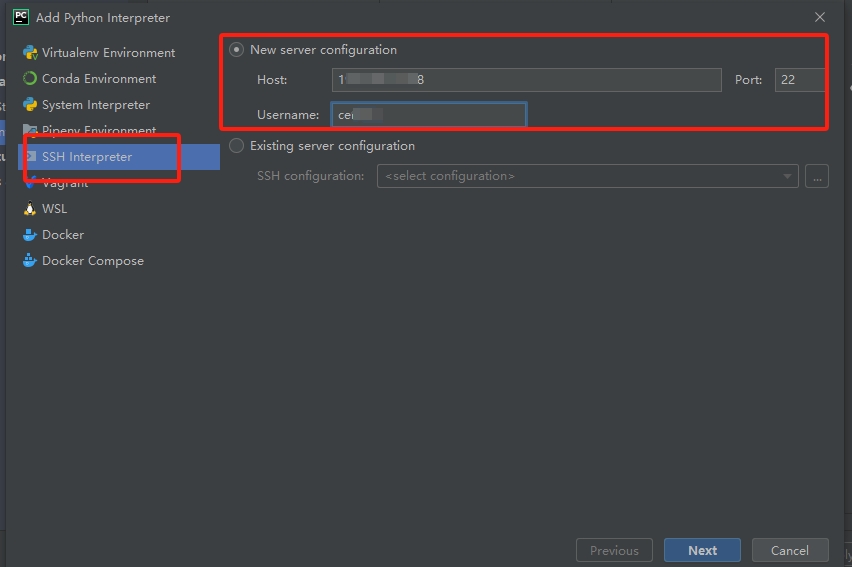
(2)add新的解析器
微信截图_20240314111021.png

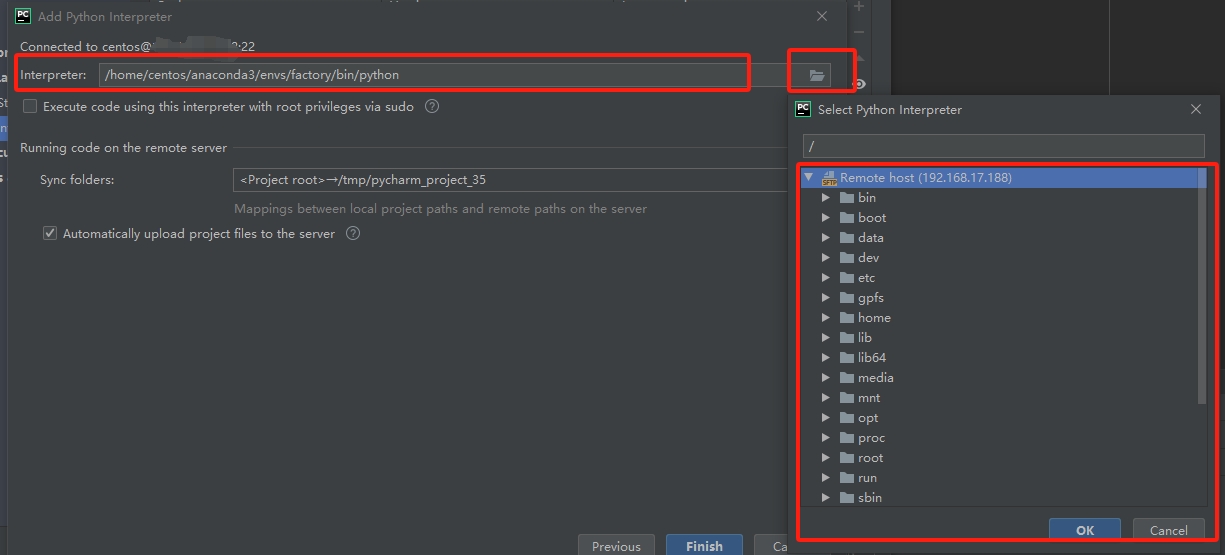
(3)通过ssh 添加远程的,写Ip和用户名,后面输入密码
11531.png

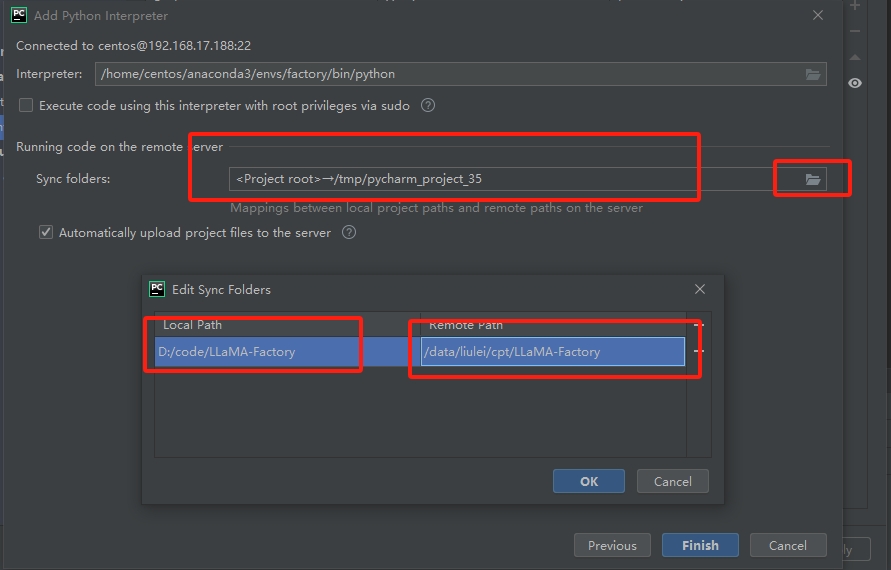
(4)从远程服务器中选择解析器、远程服务器代码和本地代码进行映射

12024.png

2247.png

(5)配置debug执行入口命令

20240314112930.png

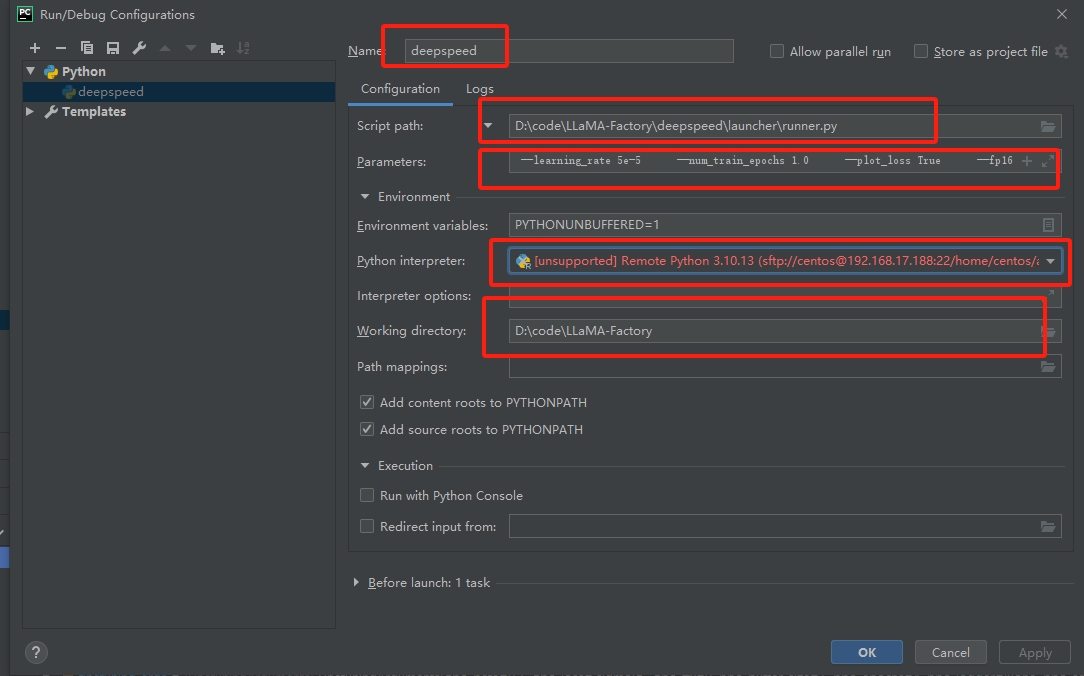
(6)脚本、参数、python解析器、代码路径配置

微信截图_20240314113559.png

入口脚本:D:codeLLaMA-Factorydeepspeedlauncherrunner.py
参数:注意这里面的脚步,就是上面的pretrain.sh启动脚本,但是需要把deepspeed命令去掉,并且把反斜杠去掉,且要把默认参数True 补充完整。


--master_port=9901  src/train_bash.py      --deepspeed ./ds_config.json      --stage pt     --do_train True      --model_name_or_path ../Yi-34B-Chat      --dataset input_test      --finetuning_type full      --lora_target q_proj,v_proj      --output_dir path_to_pt_checkp1      --overwrite_cache True      --per_device_train_batch_size 1      --gradient_accumulation_steps 1      --lr_scheduler_type cosine      --logging_steps 1     --save_steps 100      --learning_rate 5e-5      --num_train_epochs 1.0      --plot_loss True      --fp16

完成就可以进行debug了,然后你就发现在实际运行的时候还是会报错的。需要几个地方的代码修改。

(7)本地对应代码修改

问题:1

ssh://centos@18:22/home/centos/anaconda3/envs/factory/bin/python -u /home/centos/.pycharm_helpers/pydev/pydevd.py --multiproc --qt-support=auto --client 0.0.0.0 --port 34567 --file /data/liulei/cpt/LLaMA-Factory/deepspeed/launcher/runner.py --master_port=9901 src/train_bash.py --deepspeed ./ds_config.json --stage pt --do_train True --model_name_or_path ../Yi-34B-Chat --dataset input_test --finetuning_type full --lora_target q_proj,v_proj --output_dir path_to_pt_checkp1 --overwrite_cache True --per_device_train_batch_size 1 --gradient_accumulation_steps 1 --lr_scheduler_type cosine --logging_steps 1 --save_steps 100 --learning_rate 5e-5 --num_train_epochs 1.0 --plot_loss True --fp16
/home/centos/.pycharm_helpers/pydev/pydevd.py:1806: DeprecationWarning: currentThread() is deprecated, use current_thread() instead
  dummy_thread = threading.currentThread()
pydev debugger: process 232478 is connecting
Connected to pydev debugger (build 201.6668.115)
Traceback (most recent call last):
  File "/home/centos/.pycharm_helpers/pydev/pydevd.py", line 1438, in _exec
    pydev_imports.execfile(file, globals, locals)  # execute the script
  File "/home/centos/.pycharm_helpers/pydev/_pydev_imps/_pydev_execfile.py", line 18, in execfile
    exec(compile(contents+"\n", file, 'exec'), glob, loc)
  File "/data/liulei/cpt/LLaMA-Factory/deepspeed/launcher/runner.py", line 24, in <module>
    from .multinode_runner import PDSHRunner, OpenMPIRunner, MVAPICHRunner, SlurmRunner, MPICHRunner, IMPIRunner
ImportError: attempted relative import with no known parent package

解决办法:

将远程文件/data/liulei/cpt/LLaMA-Factory/deepspeed/launcher/runner.py 映射的本地文件D:\code\LLaMA-Factory\deepspeed\launcher\runner.py进行修改

修改前:

from .multinode_runner import PDSHRunner, OpenMPIRunner, MVAPICHRunner, SlurmRunner, MPICHRunner, IMPIRunner
from .constants import PDSH_LAUNCHER, OPENMPI_LAUNCHER, MVAPICH_LAUNCHER, SLURM_LAUNCHER, MPICH_LAUNCHER, IMPI_LAUNCHER
from ..constants import TORCH_DISTRIBUTED_DEFAULT_PORT
from ..nebula.constants import NEBULA_EXPORT_ENVS
from ..utils import logger

from ..autotuning import Autotuner
from deepspeed.accelerator import get_accelerator


修改后:
from deepspeed.launcher.multinode_runner import PDSHRunner, OpenMPIRunner, MVAPICHRunner, SlurmRunner, MPICHRunner, IMPIRunner
from deepspeed.launcher.constants import PDSH_LAUNCHER, OPENMPI_LAUNCHER, MVAPICH_LAUNCHER, SLURM_LAUNCHER, MPICH_LAUNCHER, IMPI_LAUNCHER
from deepspeed.constants import TORCH_DISTRIBUTED_DEFAULT_PORT
from deepspeed.nebula.constants import NEBULA_EXPORT_ENVS
from deepspeed.utils import logger

from deepspeed.autotuning import Autotuner

然后重新运行debug,就发现本地可以愉快的跑起来了。

centos安装nginx

yum -y install nginx 

CentOS系统中Nginx的默认安装目录为/etc/nginx。

如果需要修改Nginx的配置文件,可以使用vi或者nano等编辑器打开该目录下的nginx.conf文件进行编辑。

示例代码(在命令行中输入)

vim /etc/nginx/nginx.conf

启动、停止、重启Nginx服务


systemctl start nginx   # 启动Nginx
systemctl stop nginx    # 停止Nginx
systemctl restart nginx # 重启Nginx

nginx 日志

/var/log/nginx/error.log 
/var/log/nginx/access.log

配置websocket

vim /etc/nginx/nginx.conf
配置文件如下:

# For more information on configuration, see:
#   * Official English Documentation: http://nginx.org/en/docs/
#   * Official Russian Documentation: http://nginx.org/ru/docs/

user root;
worker_processes auto;
error_log /var/log/nginx/error.log;
pid /run/nginx.pid;

# Load dynamic modules. See /usr/share/doc/nginx/README.dynamic.
include /usr/share/nginx/modules/*.conf;

events {
    worker_connections 1024;
}

http {
    log_format  main  '$remote_addr - $remote_user [$time_local] "$request" '
                      '$status $body_bytes_sent "$http_referer" '
                      '"$http_user_agent" "$http_x_forwarded_for"';

    access_log  /var/log/nginx/access.log  main;

    sendfile            on;
    tcp_nopush          on;
    tcp_nodelay         on;
    keepalive_timeout   65;
    types_hash_max_size 2048;

    include             /etc/nginx/mime.types;
    default_type        application/octet-stream;

    # Load modular configuration files from the /etc/nginx/conf.d directory.
    # See http://nginx.org/en/docs/ngx_core_module.html#include
    # for more information.
    include /etc/nginx/conf.d/*.conf;


map $http_upgrade $connection_upgrade {
    default upgrade;
    '' close;
}

upstream wsbackend{
    server 192.168.17.188:9005;
    server 192.168.17.188:9006;
    keepalive 1000;
}

    server {
        listen       8009 default_server;
        #listen       [::]:80 default_server;
        server_name  localhost;
        root         /usr/share/nginx/html;

        # Load configuration files for the default server block.
        include /etc/nginx/default.d/*.conf;

        location / {
      proxy_pass http://wsbackend; 
          proxy_http_version 1.1;
          proxy_read_timeout   3600s; # 超时设置
          # 启用支持websocket连接
          proxy_set_header Upgrade $http_upgrade;
          proxy_set_header Connection "upgrade";
        }

        error_page 404 /404.html;
            location = /40x.html {
        }

        error_page 500 502 503 504 /50x.html;
            location = /50x.html {
        }
    }

# Settings for a TLS enabled server.
#
#    server {
#        listen       443 ssl http2 default_server;
#        listen       [::]:443 ssl http2 default_server;
#        server_name  _;
#        root         /usr/share/nginx/html;
#
#        ssl_certificate "/etc/pki/nginx/server.crt";
#        ssl_certificate_key "/etc/pki/nginx/private/server.key";
#        ssl_session_cache shared:SSL:1m;
#        ssl_session_timeout  10m;
#        ssl_ciphers PROFILE=SYSTEM;
#        ssl_prefer_server_ciphers on;
#
#        # Load configuration files for the default server block.
#        include /etc/nginx/default.d/*.conf;
#
#        location / {
#        }
#
#        error_page 404 /404.html;
#            location = /40x.html {
#        }
#
#        error_page 500 502 503 504 /50x.html;
#            location = /50x.html {
#        }
#    }

}

重要的是这两行,它表明是websocket连接进入的时候,进行一个连接升级将http连接变成websocket的连接。

proxy_set_header Upgrade $http_upgrade;
proxy_set_header Connection "upgrade";

proxy_read_timeout; 表明连接成功以后等待服务器响应的时候,如果不配置默认为60s;
proxy_http_version 1.1; 表明使用http版本为1.1

遇到的问题:

2023/12/18 10:59:30 [crit] 626773#0: *1 connect() to :9006 failed (13: Permission denied) while connecting to upstream, client: , server: localhost, request: "GET / HTTP/1.1", upstream: "http://192:9006/", host: ":8009

解决办法:
1.nginx.conf的 开头改为:user root;
2.关闭SeLinux
临时关闭(不用重启机器)

setenforce 0 

参考:
https://www.jianshu.com/p/6205c8769e3c
https://blog.csdn.net/lazycheerup/article/details/117323466

一、cuda-driver下载安装

1.查看cuda-driver是否安装

nvidia-smi来查看驱动是否安装
如果没有安装,可通过cuda-toolkit下载,里面包含了驱动一起安装
基于cuda-toolkit下载,里面包含了驱动,主要在里面下载对应的版本。
https://developer.nvidia.com/cuda-toolkit-archive

2.问题

问题1.
安装驱动报错:
/var/log/nvidia-installer.log

ERROR: Unable to find the kernel source tree for the currently running kernel.  Please make sure you have installed the kernel source files for your kernel and that they are properly configured; on Red Hat Linux systems, for example, be sure you have the 'kernel-source' or 'kernel-devel' RPM installed.  If you know the correct kernel source files are installed, you may specify the kernel source path with the '--kernel-source-path' command line option.
ERROR: Installation has failed.  Please see the file '/var/log/nvidia-installer.log' for details.  You may find suggestions on fixing installation problems in the README available on the Linux driver download page at www.nvidia.com.

解决办法:

yum install kernel-devel-$(uname -r)

sh cuda_12.2.2_535.104.05_linux.run --kernel-source-path=/usr/src/kernels/3.10.0-1160.el7.x86_64/

二、cuda-toolkit下载安装包

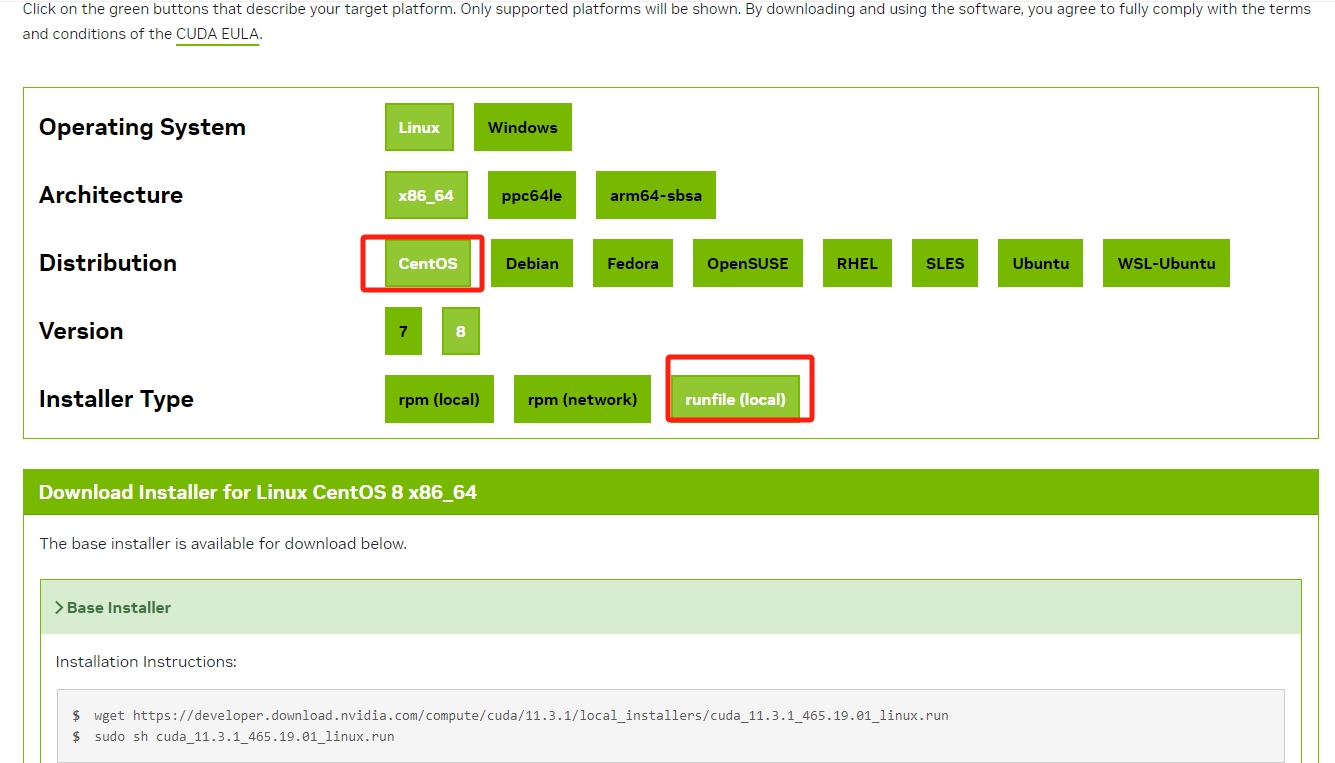
此处的安装环境为离线环境,需要先下载cuda安装文件,安装文件可以去官网地址下载对应的系统版本。官网下载地址:https://developer.nvidia.com/cuda-toolkit-archive

1143511.png

驱动和cuda版本对应:
https://docs.nvidia.com/cuda/cuda-toolkit-release-notes/index.html

- ./NVIDIA-Linux-x86_64-495.46.run --kernel-source-path=/usr/src/kernels/$(uname -r) -k $(uname -r) --dkms -s

-

问题 centos7

Using built-in stream user interface
-> Detected 32 CPUs online; setting concurrency level to 32.
-> The file '/tmp/.X0-lock' exists and appears to contain the process ID '2647' of a running X server.
ERROR: You appear to be running an X server; please exit X before installing.  For further details, please see the section INSTALLING THE NVIDIA DRIVER in the README available on the Linux driver download page at www.nvidia.com.
ERROR: Installation has failed.  Please see the file '/var/log/nvidia-installer.log' for details.  You may find suggestions on fixing installation problems in the README available on the Linux driver download page at www.nvidia.com.

解决:
systemctl stop gdm.service

问题 centos8

-> Detected 128 CPUs online; setting concurrency level to 32.
-> Tagging shared libraries with chcon -t textrel_shlib_t.
ERROR: An NVIDIA kernel module 'nvidia-uvm' appears to already be loaded in your kernel.  This may be because it is in use (for example, by an X server, a CUDA program, or the NVIDIA Persistence Daemon), but this may also happen if your kernel was configured without support for module unloading.  Please be sure to exit any programs that may be using the GPU(s) before attempting to upgrade your driver.  If no GPU-based programs are running, you know that your kernel supports module unloading, and you still receive this message, then an error may have occurred that has corrupted an NVIDIA kernel module's usage count, for which the simplest remedy is to reboot your computer.
ERROR: Installation has failed.  Please see the file '/var/log/nvidia-installer.log' for details.  You may find suggestions on fixing installation problems in the README available on the Linux driver download page at www.nvidia.com.
~

解决:
GPU正在使用,关闭正在使用的GPU

问题 centos 8

Using built-in stream user interface
-> Detected 128 CPUs online; setting concurrency level to 32.
-> Tagging shared libraries with chcon -t textrel_shlib_t.
ERROR: An NVIDIA kernel module 'nvidia' appears to already be loaded in your kernel.  This may be because it is in use (for example, by an X server, a CUDA program, or the NVIDIA Persistence Daemon), but this may also happen if your kernel was configured without support for module unloading.  Please be sure to exit any programs that may be using the GPU(s) before attempting to upgrade your driver.  If no GPU-based programs are running, you know that your kernel supports module unloading, and you still receive this message, then an error may have occurred that has corrupted an NVIDIA kernel module's usage count, for which the simplest remedy is to reboot your computer.
ERROR: Installation has failed.  Please see the file '/var/log/nvidia-installer.log' for details.  You may find suggestions on fixing installation problems in the README available on the Linux driver download page at www.nvidia.com.

解决:
GPU正在使用,关闭正在使用的GPU,通过命令:
sudo lsof /dev/nvidia*
kill -9 pid

问题:

sh ./cuda_11.6.0_510.39.01_linux.run
Extraction failed.
Ensure there is enough space in /tmp and that the installation package is not corrupt
Signal caught, cleaning up

没有安装解压软件
yum install tar

问题 centos

nvidia-smi 中可以显示GPU,但是torch.cuda.is_available() 出现如下错误:

UserWarning: CUDA initialization: Unexpected error from cudaGetDeviceCount(). Did you run some cuda functions before calling

Error 802: system not yet initialized 

centos8中解决办法

注意 驱动版本要对应上

wget https://developer.download.nvidia.cn/compute/cuda/repos/rhel8/x86_64/nvidia-fabric-manager-515.65.01-1.x86_64.rpm

sudo yum install nvidia-fabric-manager-515.65.01-1.x86_64.rpm

systemctl enable nvidia-fabricmanager

systemctl restart nvidia-fabricmanager

systemctl status nvidia-fabricmanager

安装完成后验证:

安装后的位置: /usr/local/下面

nvcc -v

三、cudnn安装

地址:https://developer.nvidia.com/rdp/cudnn-archive

选择:
(1)根据cuda的情况选择版本,例如12.x选择
Download cuDNN v8.9.7 (December 5th, 2023), for CUDA 12.x
(2)选择下载格式,一般都选择tar包
Local Installer for Linux x86_64 (Tar)

四、cuda 版本切换

一般情况下从官网下载:https://developer.nvidia.com/cuda-toolkit-archive

注意安装的时候:不要安装cuda driver

安装完成后切换软连接:

rm -rf /usr/local/cuda  #删除之前创建的软链接 
sudo ln -s /usr/local/cuda-11.3/  /usr/local/cuda/ 
nvcc --version #查看当前 cuda 版本

如果还不行直接在环境变量中修改:

vim ~/.bashrc

#然后添加

export CUDA_HOME=/usr/local/cuda
export PATH=$PATH:/usr/local/cuda/bin
export LD_LIBRARY_PATH=$LD_LIBRARY_PATH:/usr/local/cuda-11.3/lib64

遇见过一种情况还不行:

查看 which nvcc 发现指向没有变 可能就是环境变量没有改过来
查看环境变量:

echo $PATH
## 打印:/home/centos/anaconda3/bin:/home/centos/anaconda3/condabin:/home/centos/.local/bin:/home/centos/bin:/usr/local/cuda-12.2/bin:/usr/local/bin:/usr/bin:/usr/local/sbin:/usr/sbin:/usr/local/cuda/bin

##发现环境变量没有变,需要将固定指向的环境变量修改:

export PATH=/home/centos/anaconda3/bin:/home/centos/anaconda3/condabin:/home/centos/.local/bin:/home/centos/bin:/usr/local/bin:/usr/bin:/usr/local/sbin:/usr/sbin:/usr/local/cuda/bin

一、创建虚拟环境

1.1 创建 exp_detect_1 的虚拟环境:

conda create -n exp_detect_1 python=3.7

或者 直接激活虚拟环境 exp_detect_1:
conda activate exp_detect_1
(注意:退出环境的命令为:#conda deactivate)

二、虚拟环境打包

1.3 打包压缩虚拟环境 exp_detect_1
go to 此目录
cd /home/liu/miniconda3/envs/
打包压缩
tar -czvf exp_detect_1.tar.gz ./exp_detect_1

三、打包上传,解压

解压 exp_detect_1.tar.gz 到 ~/miniconda3/envs 环境目录。
cd ~/miniconda3/envs
tar -xzvf exp_detect_1.tar.gz
激活 conda 虚拟环境> exp_detect_1
conda activate exp_detect_1
python xxx

OK, run the source package

四、注意事项

怎么快速迁移 “训练环境”补丁-1

一、存在的问题
在使用文档“怎么快速迁移训练环境.pdf”中存在两个问题:
1.直接拷贝虚拟环境,部分文件路径没有修改
2.cudatoolkit包没有拷贝

二、对应的解决办法如下:
1.直接拷贝虚拟环境,部分文件路径没有修改
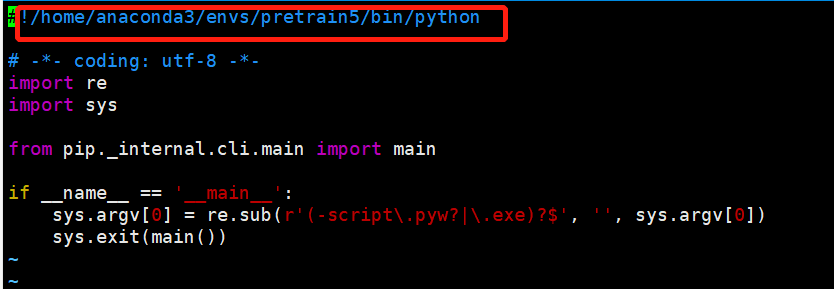
需要修改的文件所在位置:/home/anaconda3/envs/pretrain/bin (注意不同服务器conda安装位置可能不太一样)

图片1.png

修改文件:此目录下会用到的文件例如:pip、deepspeed(根据自己实际需求)
图片2.png

修改方式:将文件首行修改为当前文件实际路径

2.cudatoolkit包没有拷贝
如果虚拟环境的cudatoolkit是用过conda install 方式安装,例如下面的方式:
conda install pytorch==1.12.1 torchvision==0.13.1 torchaudio==0.12.1 cudatoolkit=11.3 -c pytorch
实际上cudatoolkit的安装位置不在拷贝的虚拟环境中,而是在conda公用目录pkgs文件夹下(/home/anaconda3/pkgs/),注意:此目录下可能共存多个cudatoolkit包,通过如下方式选择拷贝哪一个。

在原主机中激活待拷贝的虚拟环境:
conda activate pretrain6
查看cudatoolkit的build id:
conda list cudatoolkit

图片3.png

到pkgs目前查找对应的cudatoolkit包:
cd /home/anaconda3/pkgs/
ls -hl|grep “cudatoolkit”
图片4.png

打包,压缩到:
zip -r cudatoolkit-11.3.1-h9edb442_10.zip cudatoolkit-11.3.1-h9edb442_10
拷贝到目标虚拟环境对应位置(/home/anaconda3/pkgs/)解压缩:
unzip cudatoolkit-11.3.1-h9edb442_10.zip

三、torch安装的两种方式和推荐方式
安装方式官方链接:
https://pytorch.org/get-started/previous-versions/#installing-previous-versions-of-pytorch
1.linux环境下两种安装方式
官方文档中有两种安装方式:
第一种是通过conda安装,例如:
conda install pytorch==1.12.1 torchvision==0.13.1 torchaudio==0.12.1 cudatoolkit=11.3 -c pytorch
第二种是通过pip安装,例如;
pip install torch==1.12.1 torchvision==0.13.1 torchaudio==0.12.1

这两种安装方式的区别在于:
通过conda安装会安装cudatoolkit,而通过pip安装则不会。

2.推荐安装方式:conda install
通过conda install 安装方式会适配pytorch,torchvision,torchaudio,cudatoolkit的版本,如果版本不对应,就安装不成功。

用pip install 不能安装cudatoolkit,只能安装pytorch,torchvision,torchaudio,调用的是主机的cuda,可能存在cuda和torch不匹配问题。

可能遇见的问题

1.openssl

OpenSSL 3.0's legacy provider failed to load. This is a fatal error by default, but cryptography supports running without legacy algorithms by setting the environment variable CRYPTOGRAPHY_OPENSSL_NO_LEGACY. If you did not expect this error, you have likely made a mistake with your OpenSSL configuration. 

修改方式:
在虚拟环境下直接执行:export CRYPTOGRAPHY_OPENSSL_NO_LEGACY=1