centos安装cuda|gpu驱动
一、cuda-driver下载安装
1.查看cuda-driver是否安装
nvidia-smi来查看驱动是否安装
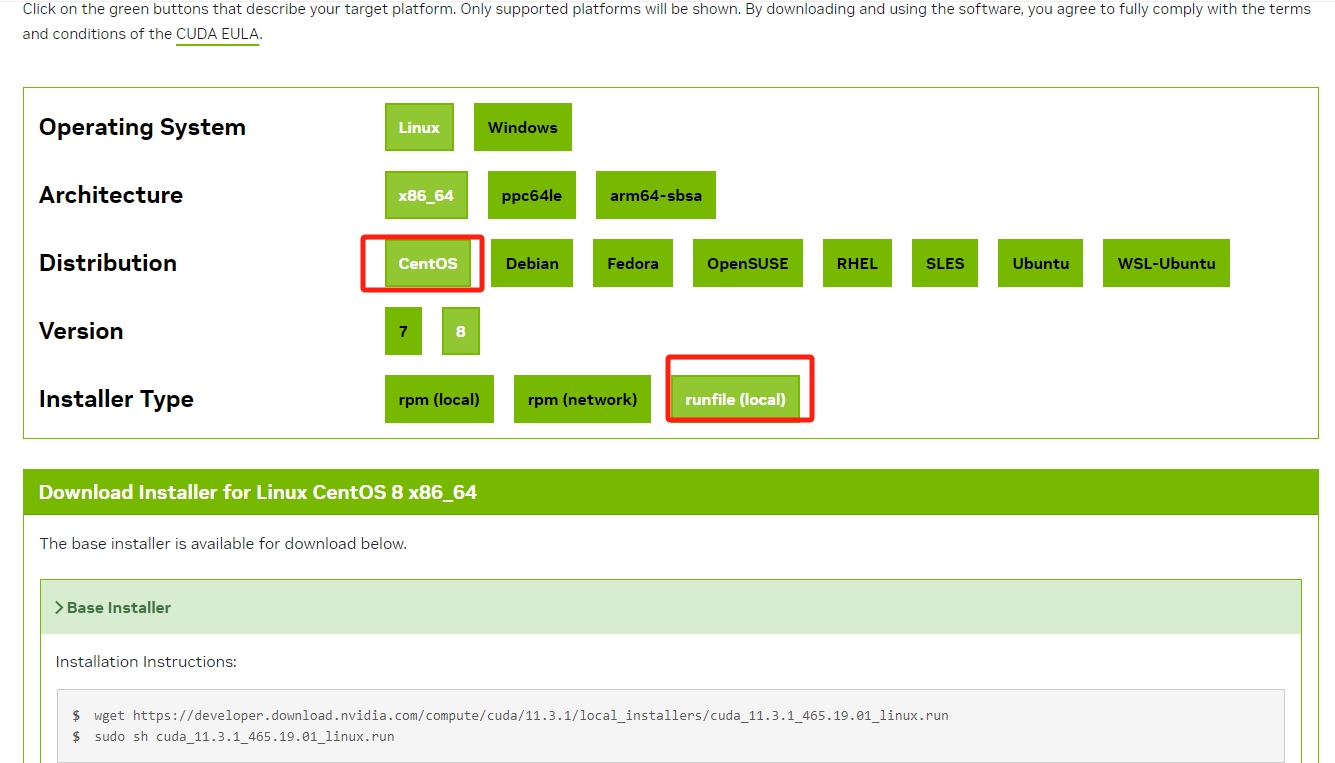
如果没有安装,可通过cuda-toolkit下载,里面包含了驱动一起安装
基于cuda-toolkit下载,里面包含了驱动,主要在里面下载对应的版本。
https://developer.nvidia.com/cuda-toolkit-archive
2.问题
问题1.
安装驱动报错:
/var/log/nvidia-installer.log
ERROR: Unable to find the kernel source tree for the currently running kernel.  Please make sure you have installed the kernel source files for your kernel and that they are properly configured; on Red Hat Linux systems, for example, be sure you have the 'kernel-source' or 'kernel-devel' RPM installed.  If you know the correct kernel source files are installed, you may specify the kernel source path with the '--kernel-source-path' command line option.
ERROR: Installation has failed.  Please see the file '/var/log/nvidia-installer.log' for details.  You may find suggestions on fixing installation problems in the README available on the Linux driver download page at www.nvidia.com.
解决办法:
yum install kernel-devel-$(uname -r)

sh cuda_12.2.2_535.104.05_linux.run --kernel-source-path=/usr/src/kernels/3.10.0-1160.el7.x86_64/
二、cuda-toolkit下载安装包
此处的安装环境为离线环境,需要先下载cuda安装文件,安装文件可以去官网地址下载对应的系统版本。官网下载地址:https://developer.nvidia.com/cuda-toolkit-archive

驱动和cuda版本对应:
https://docs.nvidia.com/cuda/cuda-toolkit-release-notes/index.html
查看版本
cat /etc/redhat-release
- CentOS Linux release 7.6.1810 (Core)
uname -r
- 3.10.0-957.el7.x86_64
GPU
- lspci | grep -i nvidia
- 01:00.0 VGA compatible controller: NVIDIA Corporation GP102 [GeForce GTX 1080 Ti] (rev a1)
01:00.1 Audio device: NVIDIA Corporation GP102 HDMI Audio Controller (rev a1) 驱动版本
- sudo dpkg --list | grep nvidia-*
驱动下载
(安装教程)
下载与系统内核版本对应的kernel-devel、kernel-headers
问题:
Error 'An NVIDIA kernel module 'nvidia' appears to already be loaded in your kernel' when trying to get GPU support in AWS EMR
- https://stackoverflow.com/questions/66680948/error-an-nvidia-kernel-module-nvidia-appears-to-already-be-loaded-in-your-ker
sudo lsof /dev/nvidia*
Cannot generate ORC metadata for CONFIG_UNWINDER_ORC=y, please install libelf-dev, libelf-devel or elfutils-libelf-devel
解决:yum install elfutils-libelf-devel (centos8)
-查看内核版本是否一致:uname -r和在usr/src下的版本号不一致:http://jiaocheng.bubufx.com/info-show-1012538.html
1.1.安装c编译器 yum install gcc
2.1安装kernel-devel yum install kernel-devel
3.检查kernel跟kernel-devel的版本号 uname -r | rpm -q kernel
4.4.两个版本号不一致,进行升级 yum -y update kernel kernel-devel
5.再次检查版本号,还不一致,需要重启。 reboot
关闭 X server
- systemctl stop gdm.service
开启 X server
- systemctl start gdm.service
The Nouveau kernel driver is currently in use by your system
查看
- lsmod | grep nouveau
- https://blog.csdn.net/qq_37296212/article/details/114265216
-
- ./NVIDIA-Linux-x86_64-495.46.run --kernel-source-path=/usr/src/kernels/$(uname -r) -k $(uname -r) --dkms -s-
cuda 安装
- https://blog.csdn.net/sinat_32724581/article/details/106807070
环境变量
- vim ~/.bashrc
- 下面加进去有
export LD_LIBRARY_PATH=$LD_LIBRARY_PATH:/usr/local/cuda/lib64
export PATH=$PATH:/usr/local/cuda/bin
export CUDA_HOME=$CUDA_HOME:/usr/local/cuda
source一下- source ~/.bashrc
cudnn 安装
- https://blog.csdn.net/zhouchen1998/article/details/107778087
验证:
- cat /usr/local/cuda/include/cudnn.h | grep CUDNN_MAJOR -A 2
-
- cat /usr/local/cuda/include/cudnn.h | grep CUDNN_MAJOR -A 2
coda 安装
问题 centos7
Using built-in stream user interface
-> Detected 32 CPUs online; setting concurrency level to 32.
-> The file '/tmp/.X0-lock' exists and appears to contain the process ID '2647' of a running X server.
ERROR: You appear to be running an X server; please exit X before installing.  For further details, please see the section INSTALLING THE NVIDIA DRIVER in the README available on the Linux driver download page at www.nvidia.com.
ERROR: Installation has failed.  Please see the file '/var/log/nvidia-installer.log' for details.  You may find suggestions on fixing installation problems in the README available on the Linux driver download page at www.nvidia.com.
解决:
systemctl stop gdm.service
问题 centos8
-> Detected 128 CPUs online; setting concurrency level to 32.
-> Tagging shared libraries with chcon -t textrel_shlib_t.
ERROR: An NVIDIA kernel module 'nvidia-uvm' appears to already be loaded in your kernel.  This may be because it is in use (for example, by an X server, a CUDA program, or the NVIDIA Persistence Daemon), but this may also happen if your kernel was configured without support for module unloading.  Please be sure to exit any programs that may be using the GPU(s) before attempting to upgrade your driver.  If no GPU-based programs are running, you know that your kernel supports module unloading, and you still receive this message, then an error may have occurred that has corrupted an NVIDIA kernel module's usage count, for which the simplest remedy is to reboot your computer.
ERROR: Installation has failed.  Please see the file '/var/log/nvidia-installer.log' for details.  You may find suggestions on fixing installation problems in the README available on the Linux driver download page at www.nvidia.com.
~
解决:
GPU正在使用,关闭正在使用的GPU
问题 centos 8
Using built-in stream user interface
-> Detected 128 CPUs online; setting concurrency level to 32.
-> Tagging shared libraries with chcon -t textrel_shlib_t.
ERROR: An NVIDIA kernel module 'nvidia' appears to already be loaded in your kernel.  This may be because it is in use (for example, by an X server, a CUDA program, or the NVIDIA Persistence Daemon), but this may also happen if your kernel was configured without support for module unloading.  Please be sure to exit any programs that may be using the GPU(s) before attempting to upgrade your driver.  If no GPU-based programs are running, you know that your kernel supports module unloading, and you still receive this message, then an error may have occurred that has corrupted an NVIDIA kernel module's usage count, for which the simplest remedy is to reboot your computer.
ERROR: Installation has failed.  Please see the file '/var/log/nvidia-installer.log' for details.  You may find suggestions on fixing installation problems in the README available on the Linux driver download page at www.nvidia.com.
解决:
GPU正在使用,关闭正在使用的GPU,通过命令:
sudo lsof /dev/nvidia*
kill -9 pid
问题:
sh ./cuda_11.6.0_510.39.01_linux.run
Extraction failed.
Ensure there is enough space in /tmp and that the installation package is not corrupt
Signal caught, cleaning up
没有安装解压软件
yum install tar
问题 centos
nvidia-smi 中可以显示GPU,但是torch.cuda.is_available() 出现如下错误:
UserWarning: CUDA initialization: Unexpected error from cudaGetDeviceCount(). Did you run some cuda functions before calling

Error 802: system not yet initialized
centos8中解决办法
注意 驱动版本要对应上
sudo yum install nvidia-fabric-manager-515.65.01-1.x86_64.rpm
systemctl enable nvidia-fabricmanager
systemctl restart nvidia-fabricmanager
systemctl status nvidia-fabricmanager
安装完成后验证:
安装后的位置: /usr/local/下面
nvcc -v
三、cudnn安装
地址:https://developer.nvidia.com/rdp/cudnn-archive
选择:
(1)根据cuda的情况选择版本,例如12.x选择
Download cuDNN v8.9.7 (December 5th, 2023), for CUDA 12.x
(2)选择下载格式,一般都选择tar包
Local Installer for Linux x86_64 (Tar)
四、cuda 版本切换
一般情况下从官网下载:https://developer.nvidia.com/cuda-toolkit-archive
注意安装的时候:不要安装cuda driver
安装完成后切换软连接:
rm -rf /usr/local/cuda  #删除之前创建的软链接
sudo ln -s /usr/local/cuda-11.3/  /usr/local/cuda/
nvcc --version #查看当前 cuda 版本
如果还不行直接在环境变量中修改:
vim ~/.bashrc

#然后添加

export CUDA_HOME=/usr/local/cuda
export PATH=$PATH:/usr/local/cuda/bin
export LD_LIBRARY_PATH=$LD_LIBRARY_PATH:/usr/local/cuda-11.3/lib64
遇见过一种情况还不行:
查看 which nvcc 发现指向没有变 可能就是环境变量没有改过来
查看环境变量:
echo $PATH
## 打印:/home/centos/anaconda3/bin:/home/centos/anaconda3/condabin:/home/centos/.local/bin:/home/centos/bin:/usr/local/cuda-12.2/bin:/usr/local/bin:/usr/bin:/usr/local/sbin:/usr/sbin:/usr/local/cuda/bin

##发现环境变量没有变,需要将固定指向的环境变量修改:

export PATH=/home/centos/anaconda3/bin:/home/centos/anaconda3/condabin:/home/centos/.local/bin:/home/centos/bin:/usr/local/bin:/usr/bin:/usr/local/sbin:/usr/sbin:/usr/local/cuda/bin


